Help Center External Integration
Enlighten Solargraf Integration to Create Enlighten system
Published on 9 Jul 2026
Create an Enlighten system directly from Solargraf by exporting eligible project, homeowner, and design data in a guided workflow. This article explains who can use the feature, what it does, the end-to-end steps, common issues, and recommended best practices.
Overview
Export to Enlighten lets installers create an Enlighten system from a Solargraf project without re-entering the same information in both platforms. The integration transfers key project details, homeowner details, selected design information, and system data into Enlighten as part of one guided flow.
This helps reduce duplicate work, improve data consistency, and speed up the handoff from project design to system creation.
Who is this for?
This feature is intended for Solargraf installers who need to create an Enlighten system from a Solargraf project.
Installers working on eligible solar projects that include Enphase microinverters
Users whose company has connected an Enlighten account in Solargraf
Users who have permission to create Enlighten systems from within Solargraf
If your company has not connected Enlighten credentials, the export flow cannot continue until that connection is set up in Company Settings → External Integrations.
What the integration enables
| Capability | Description |
|---|---|
| Export from project overview | Start Enlighten system creation from the Solargraf project overview page |
| Design and financing selection | Select the design option and financing option to use for the Enlighten system |
| Automatic data transfer | Send homeowner, project, and system information to Enlighten |
| Panel array sync | Send design array details for selected design option to Enlighten |
| System confirmation | Receive immediate success or failure feedback after export |
| Cross-platform reference | View the Enlighten System ID in Solargraf after a successful export |
The integration gives installers a single workflow for moving a project from Solargraf into Enlighten.
End to End Workflow
1. Connect the company Enlighten account
1. Open Company Settings 2. Go to External Integrations 3. Connect the Enlighten account through the available authentication flow.
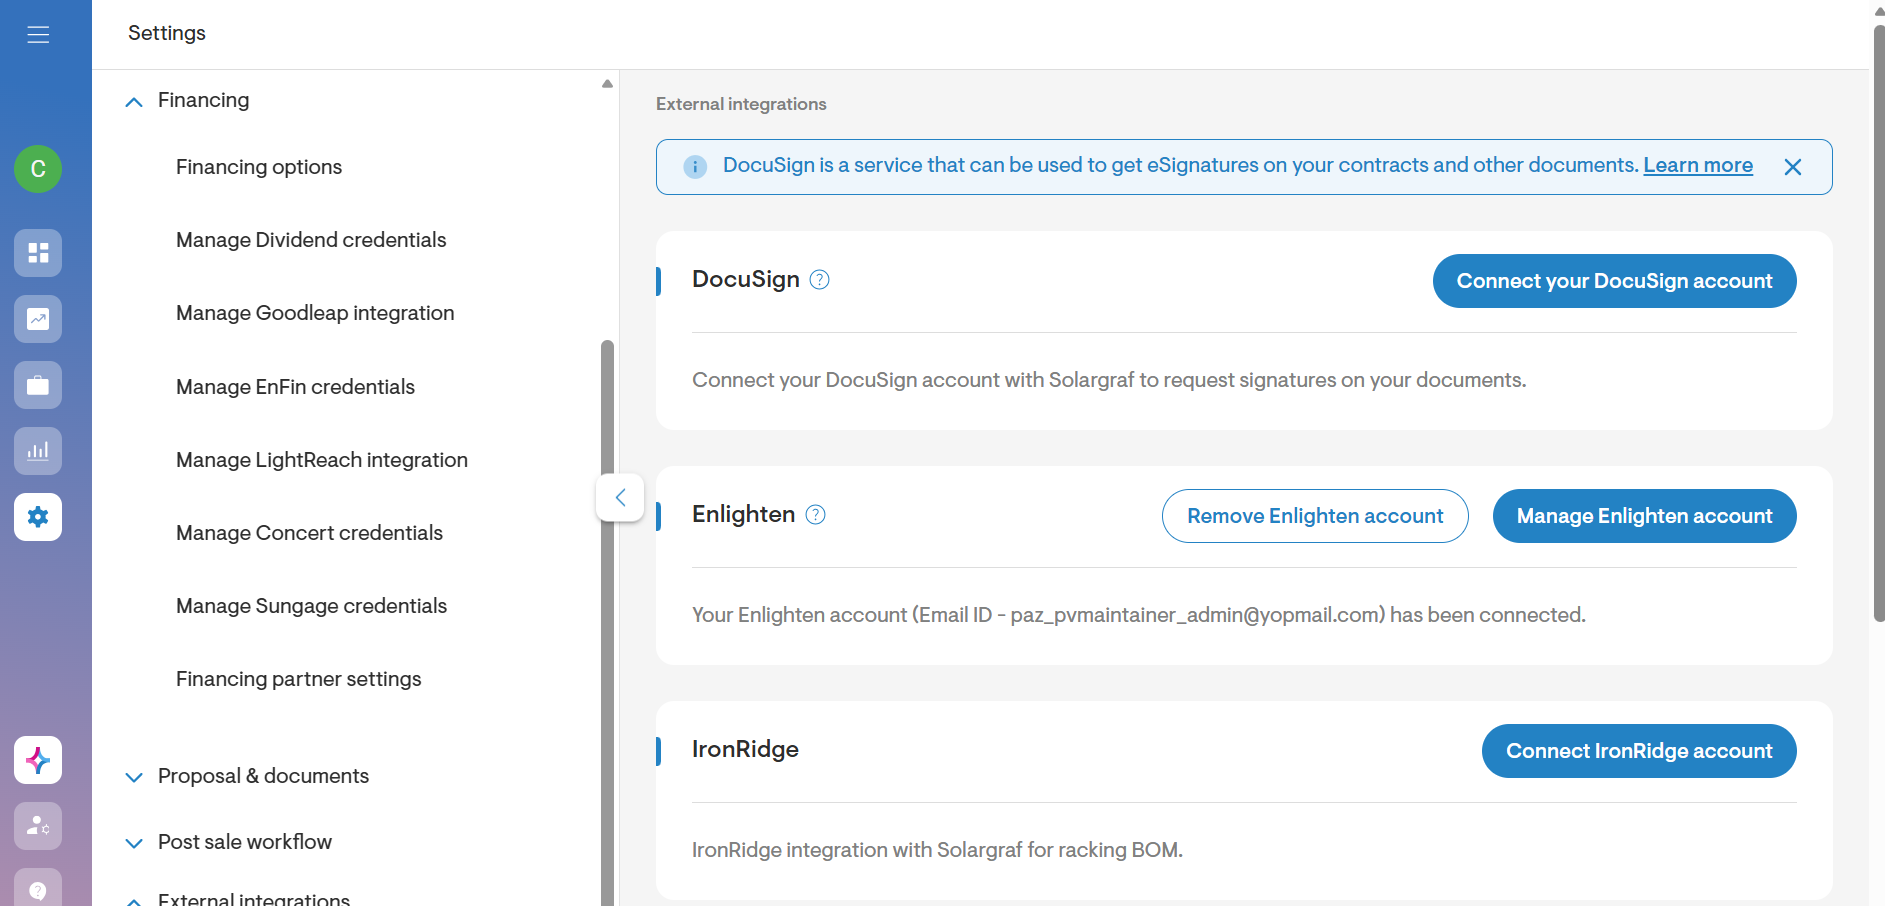
If the account is not connected, the installer will see a message explaining that an Enlighten account must be connected before export can proceed.
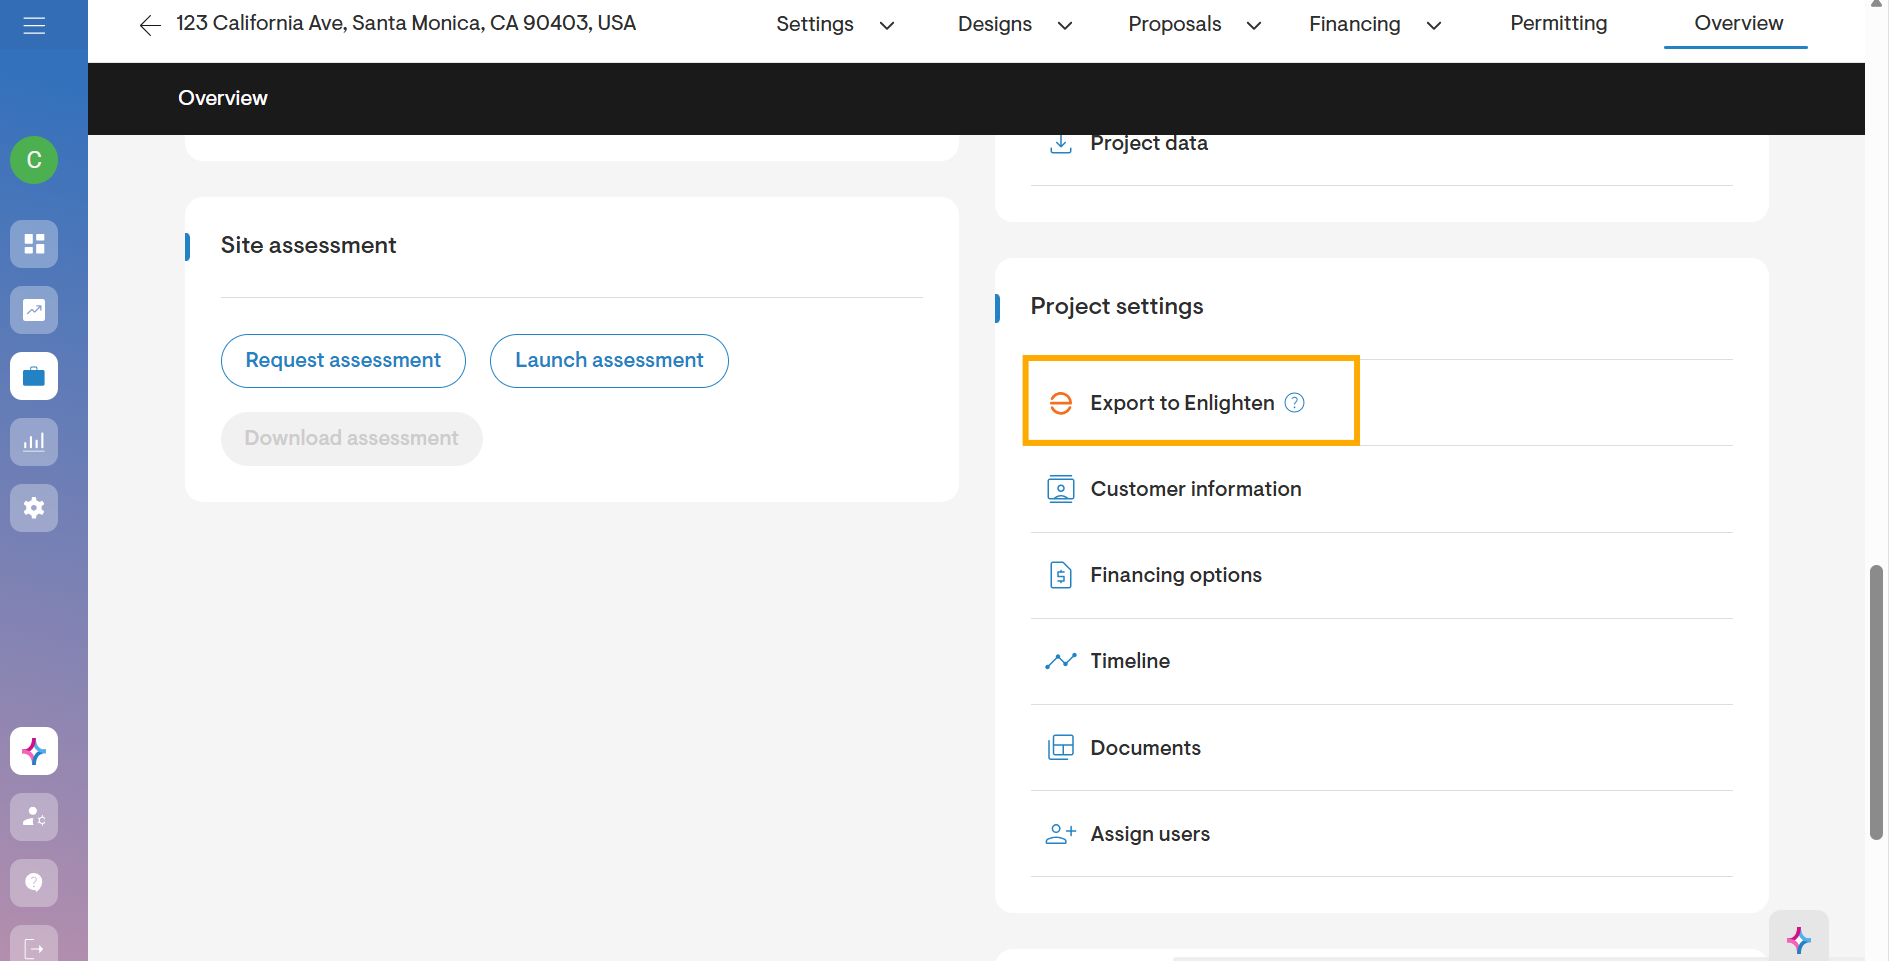
2. Open the project and start the export
From the Solargraf project overview page, the installer selects Export to Enlighten.
This action launches the export flow for the current project.
3. Select the design and financing option
A pop-up asks the installer to choose the design option and financing option to export.
Design option: shows eligible designs for export.
Financing option: shows financing options that are valid for the selected design.
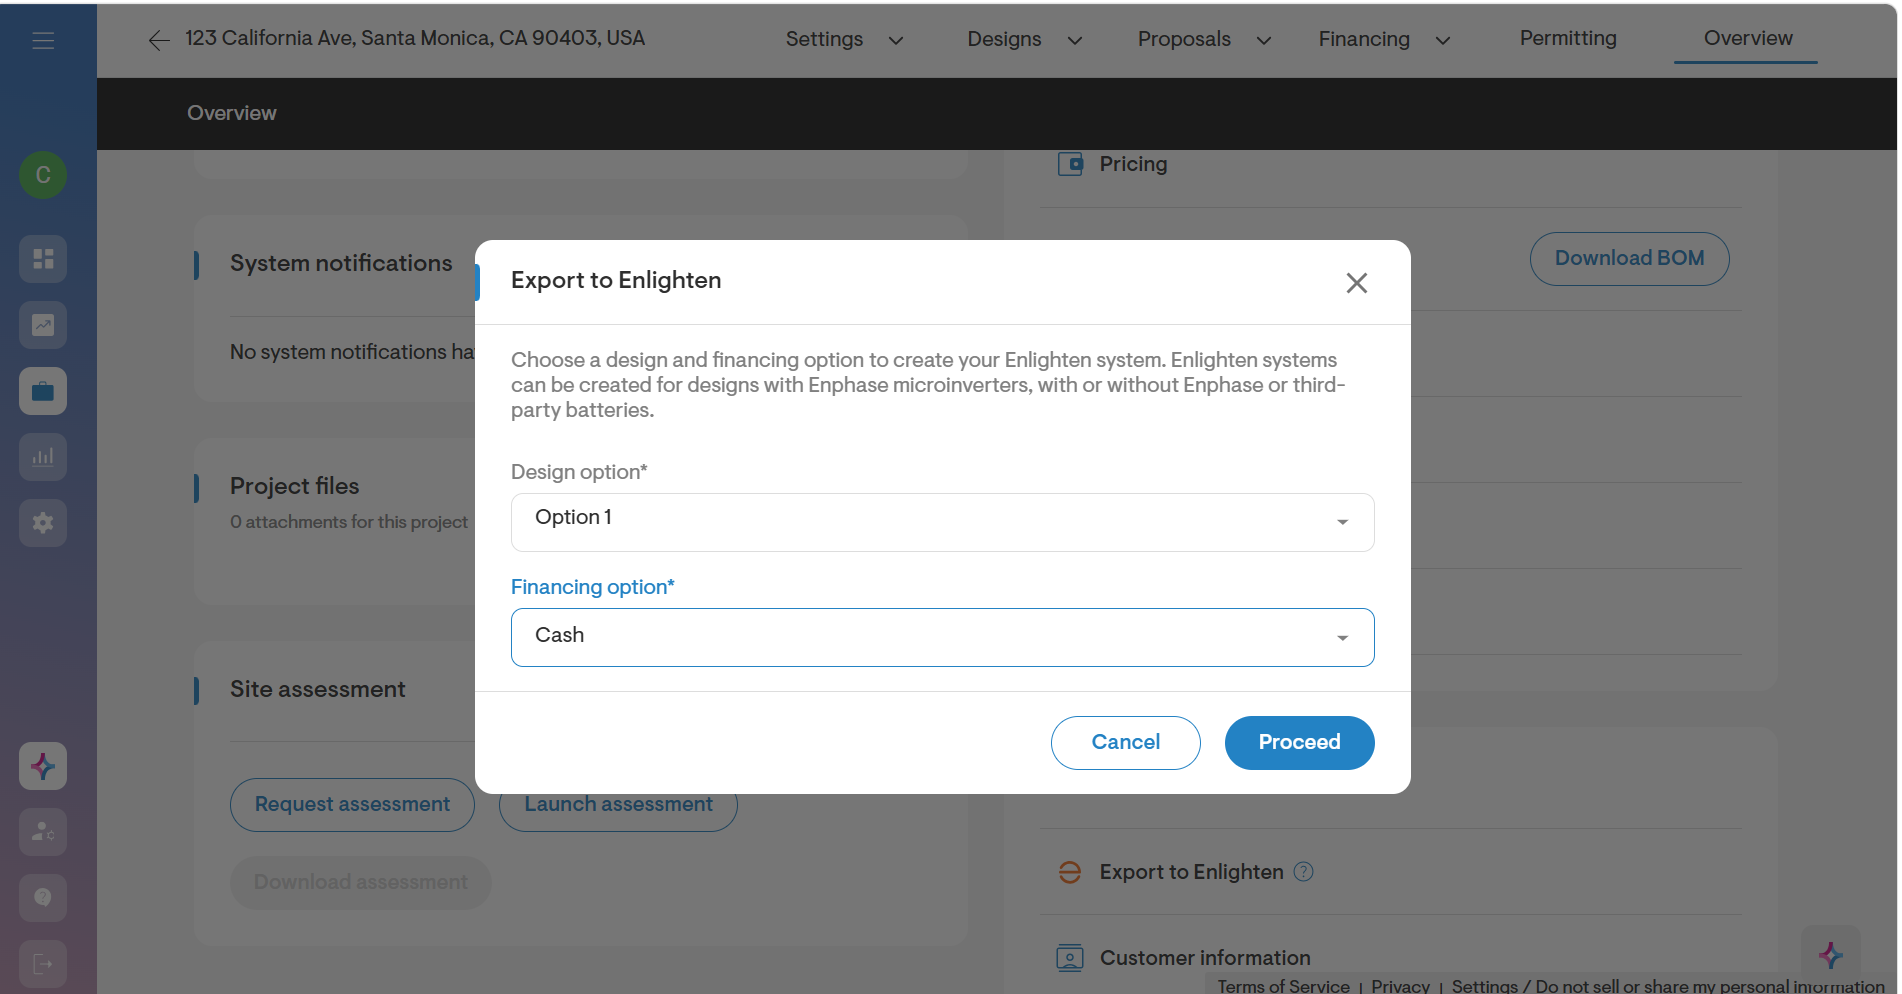
The installer must select both before continuing.
Note: Only eligible designs can be exported. If no eligible design is available, the installer cannot continue until the project includes a supported design.
4. Review and confirm export details
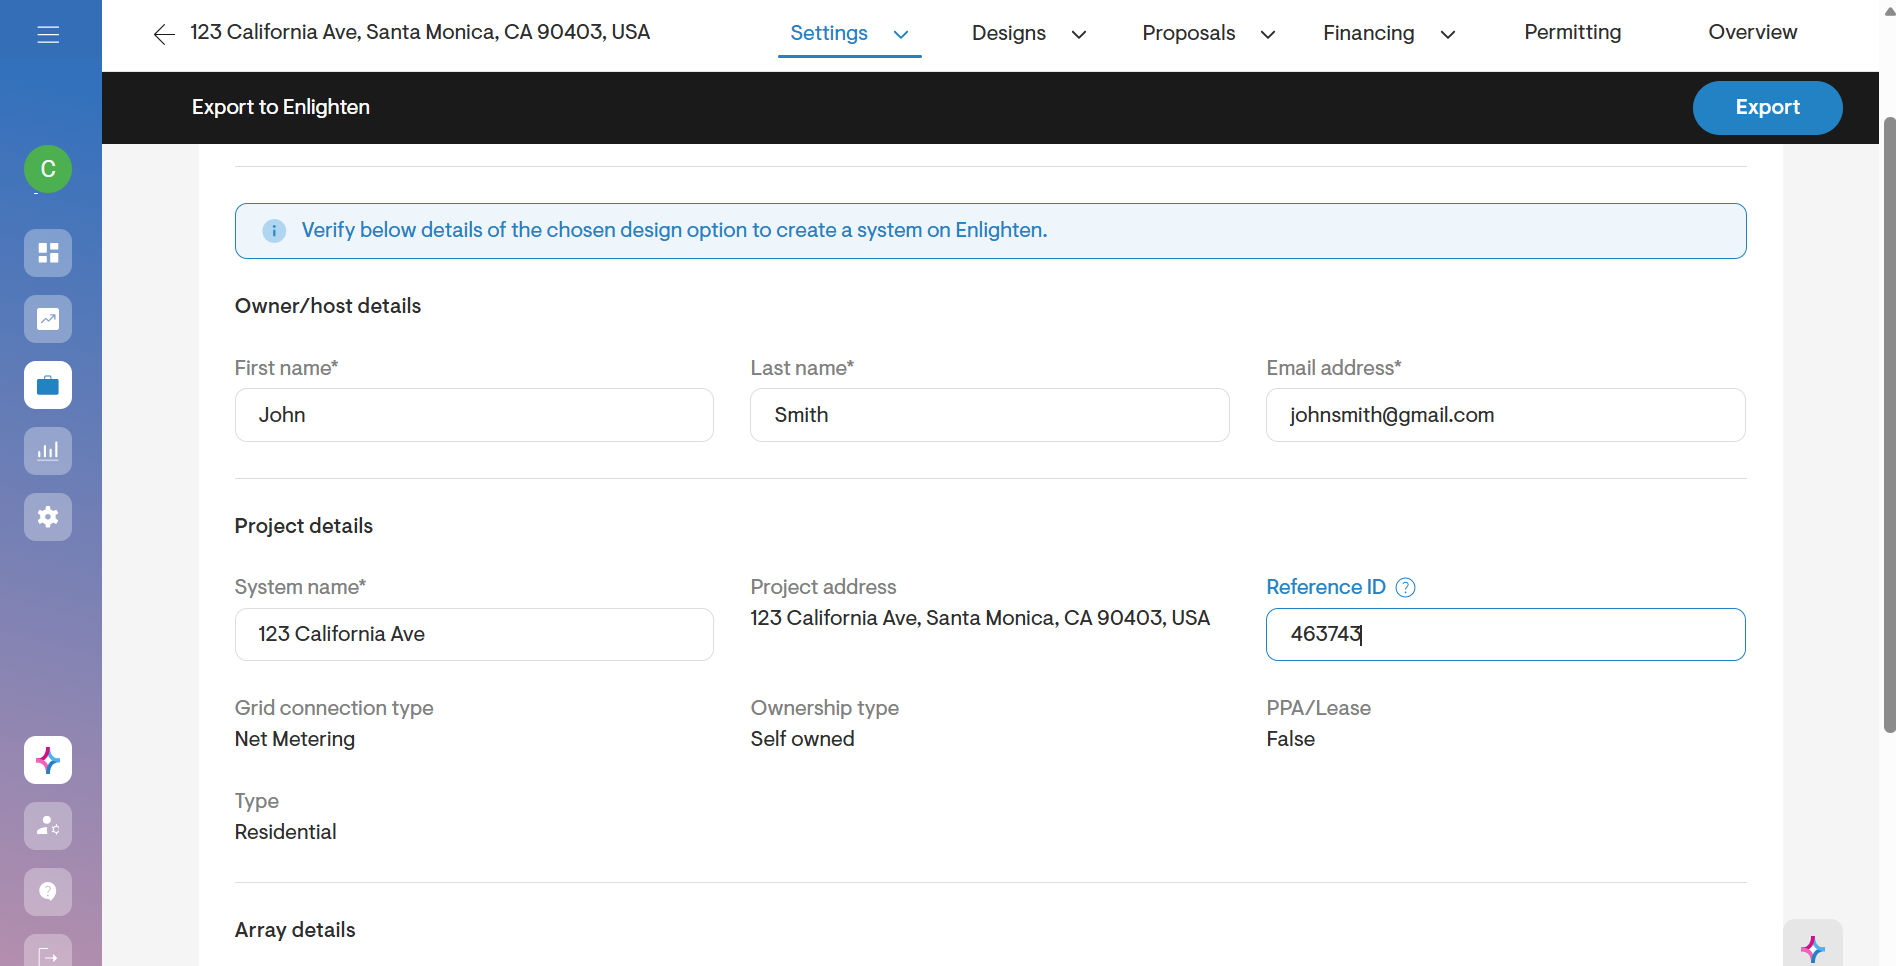
After clicking Proceed, the installer lands on the Export to Enlighten page. This page lets the installer review the information that will be sent to Enlighten.
Owner or host details
The installer reviews and, where allowed, updates the homeowner or host details.
First name
Last name
Email
These fields are important because they are used during system creation.
Project details
The page also displays project-level details used for export.
System name
Project address
Reference ID
Grid connection type
Project type such as residential or commercial
Ownership type
PPA or lease indicator when applicable
Battery manufacturer details when relevant
Panel array details
The selected design's array information is included as part of the export context. This can include array naming, orientation, tilt, azimuth, mount information, and panel-related details.
5. Complete validations and click Export
Before export succeeds, Solargraf validates the required fields.
System name must be present
First name, last name, and email must be provided
Reference ID, if used, must meet the allowed format
If validation fails, the page displays clear error messaging so the installer can fix the issue and retry.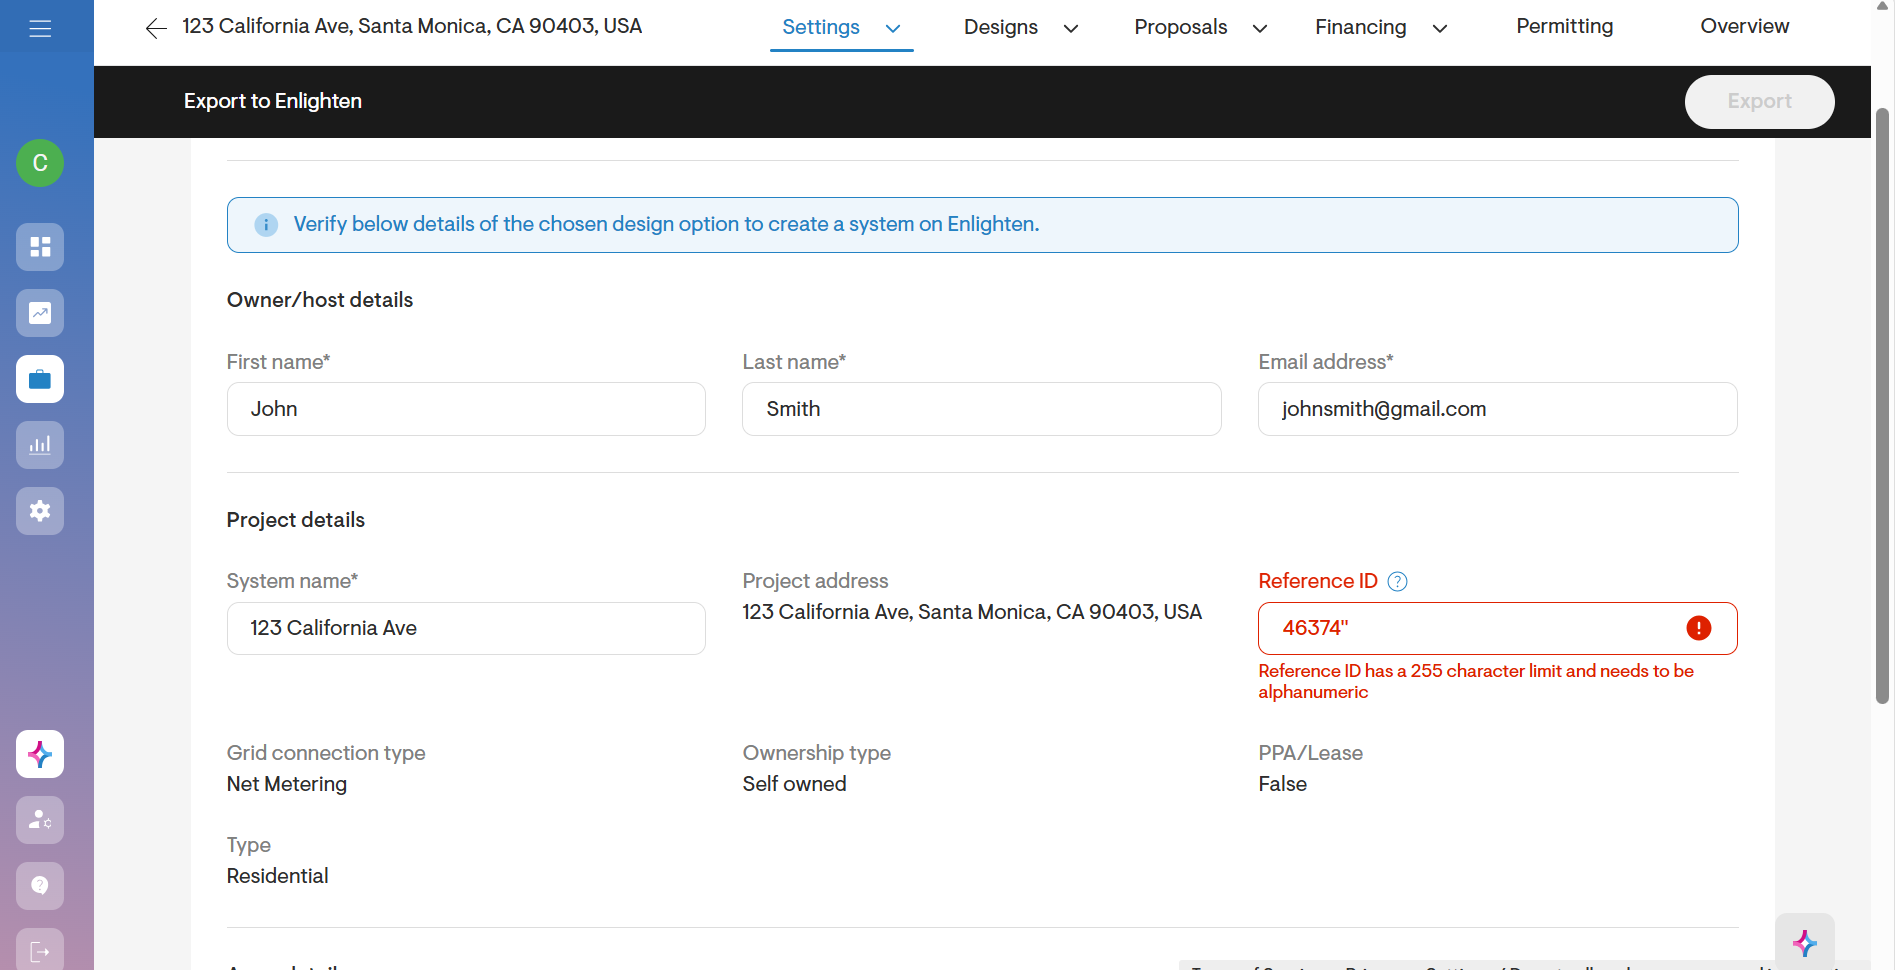
6. Create the Enlighten system
When the installer clicks Export, Solargraf sends the required data to Enlighten and attempts to create the system.
On success, the installer sees confirmation that the Enlighten system was created. A link to the Enlighten system is provided, and the resultingEnlighten System ID is stored in Solargraf for reference.
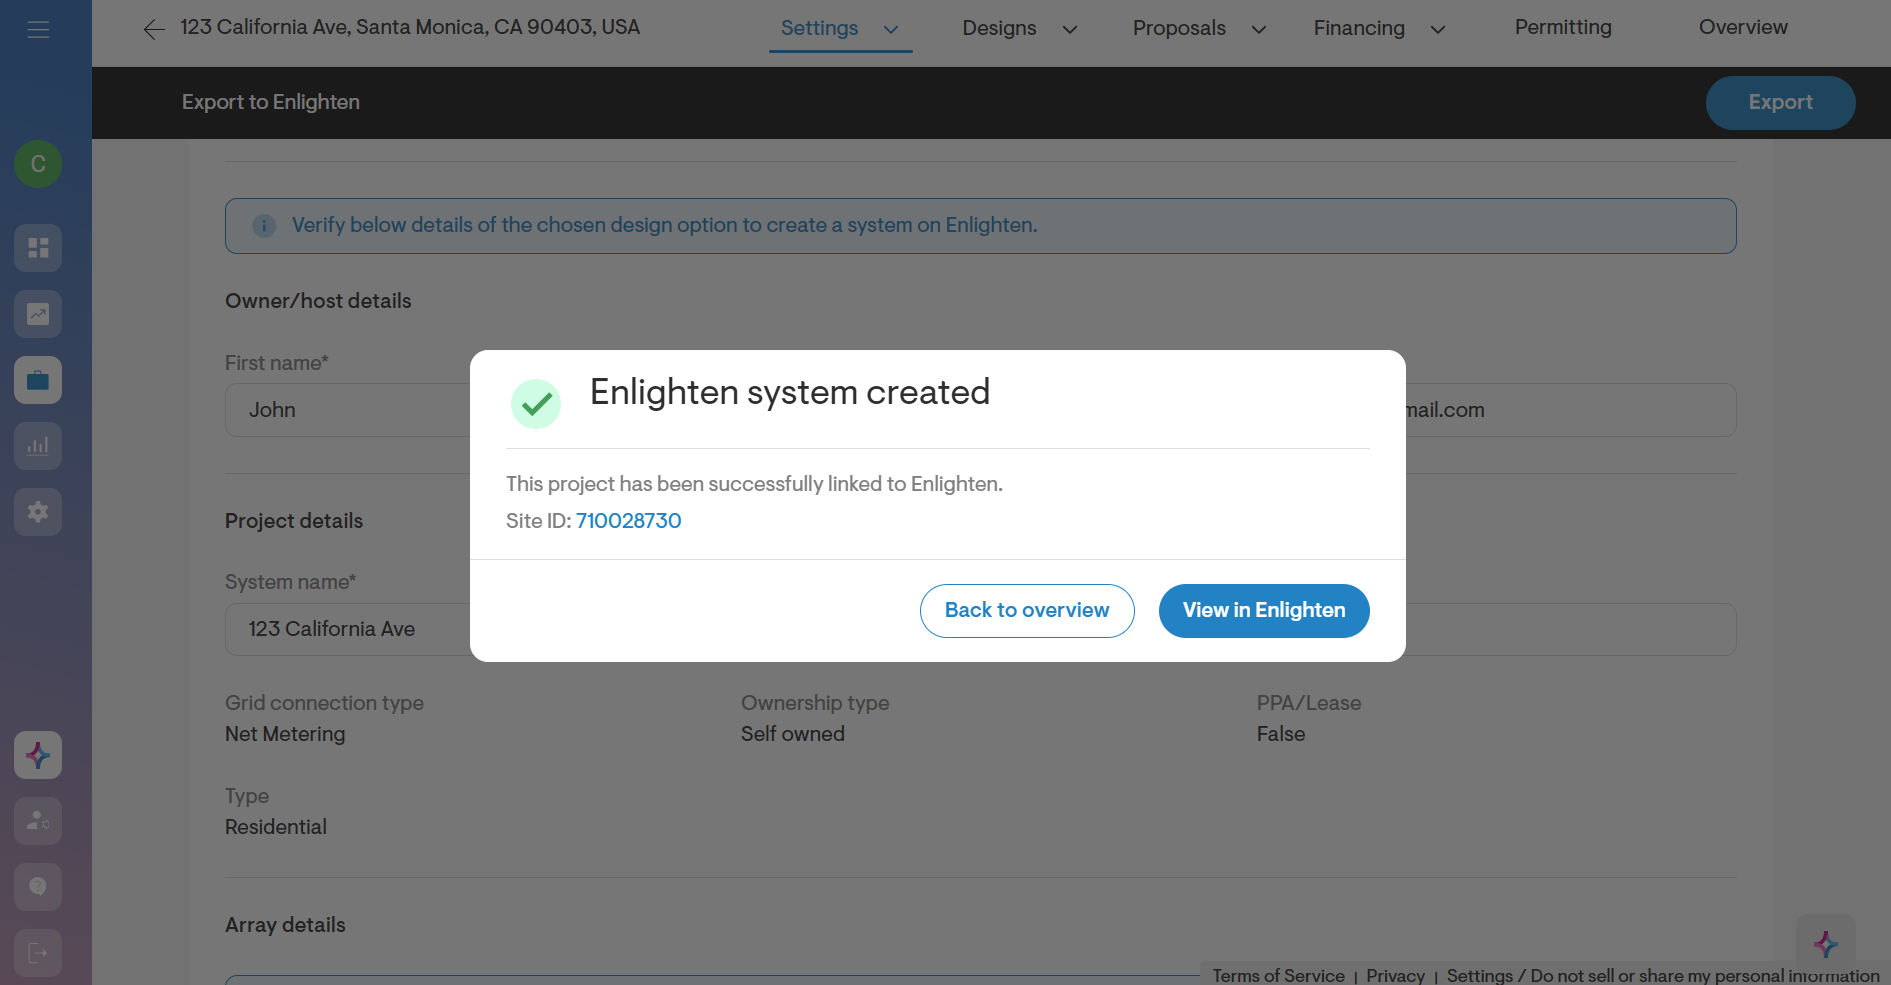
System notifications are updated to show the details of success/failure for user creation, Enlighten system creation and posting of panel arrays to Enlighten for the system created.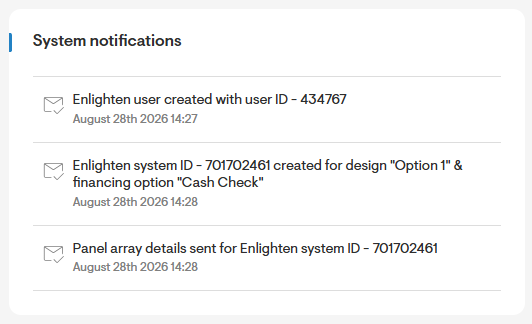
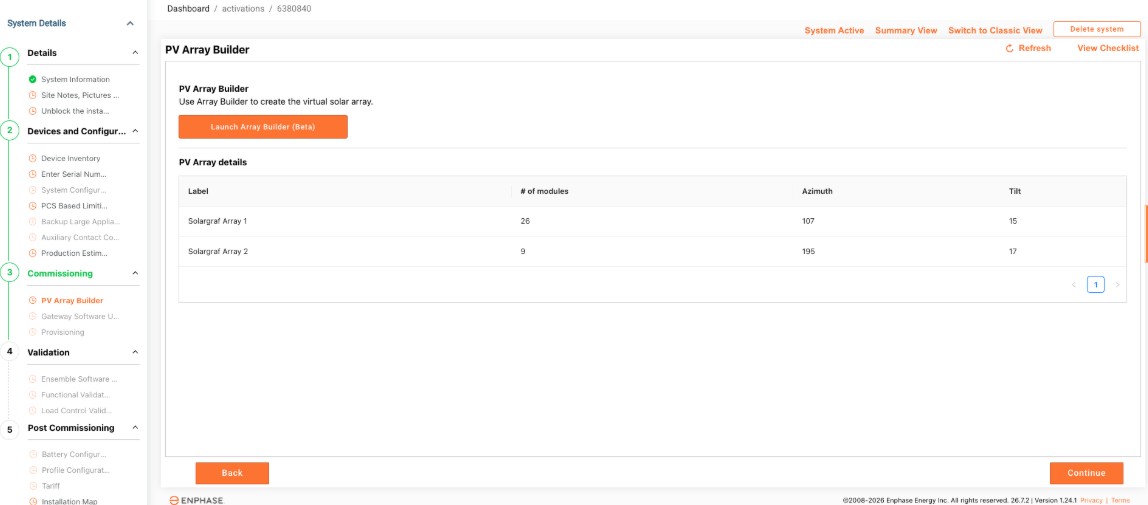
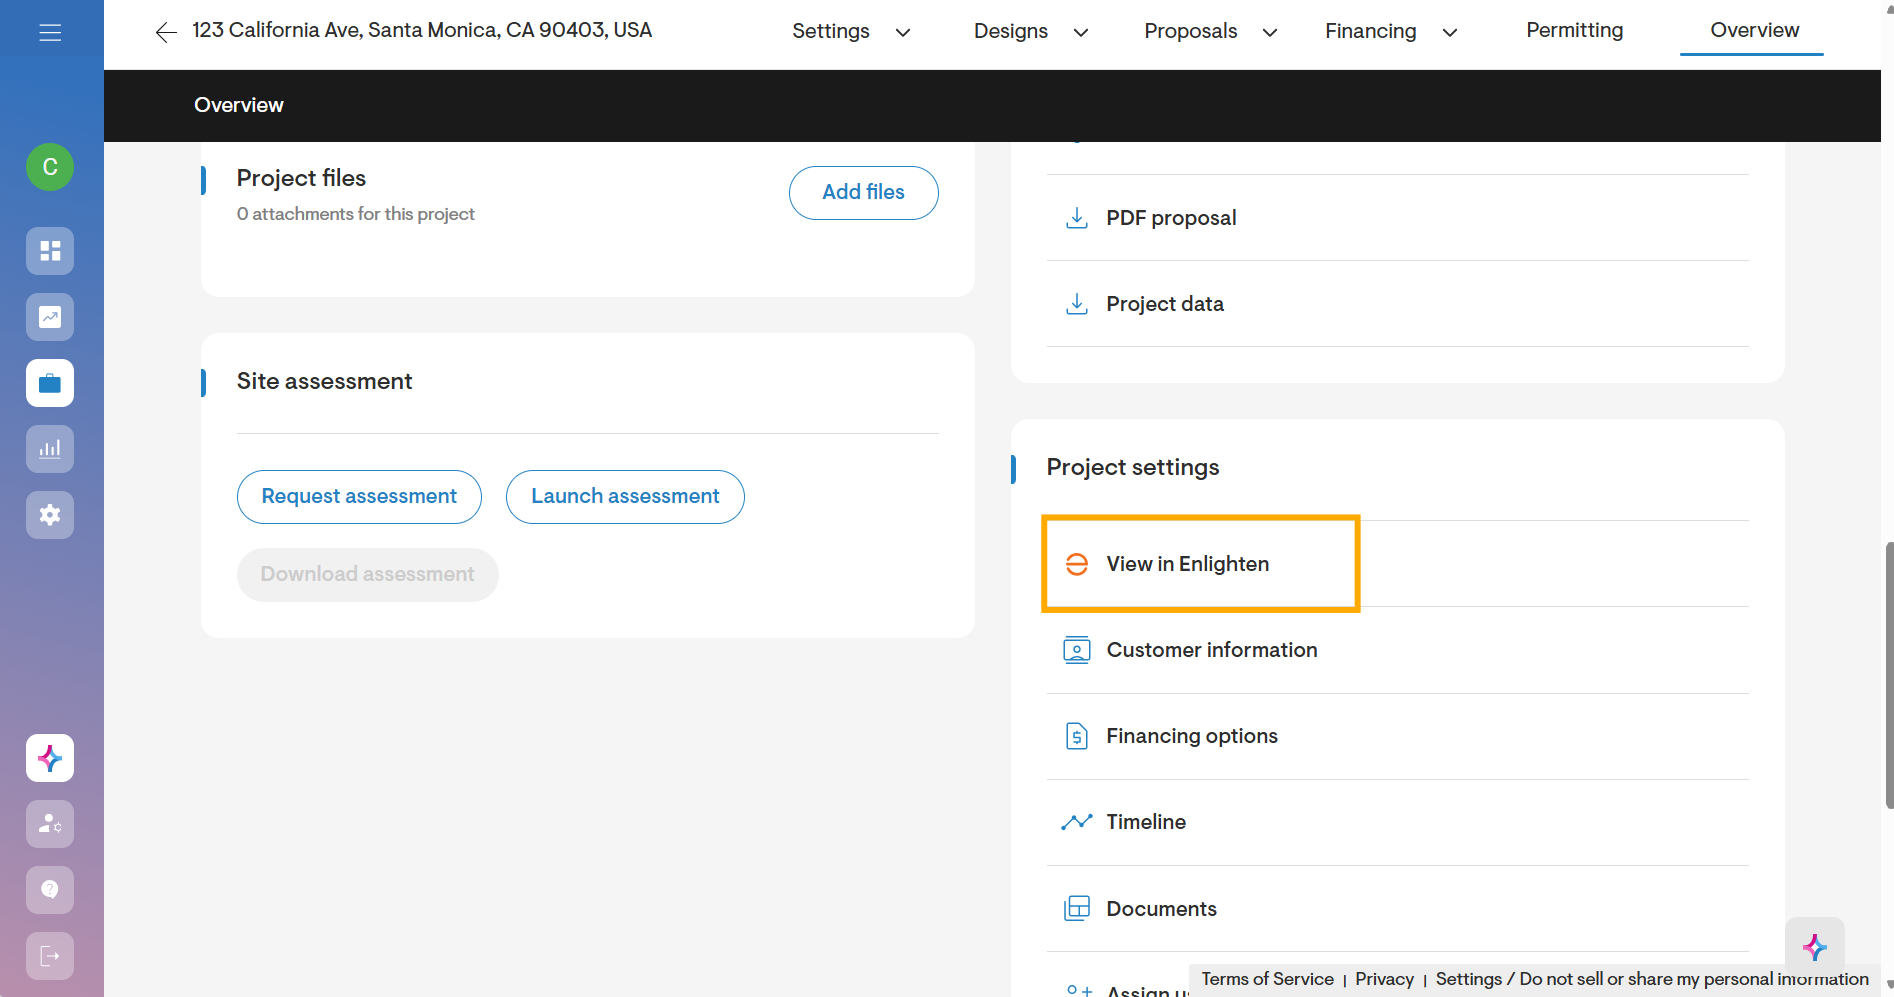
Upon clicking the Enlighten System ID or View in Enlighten, you will be redirected to Enlighten activation page.
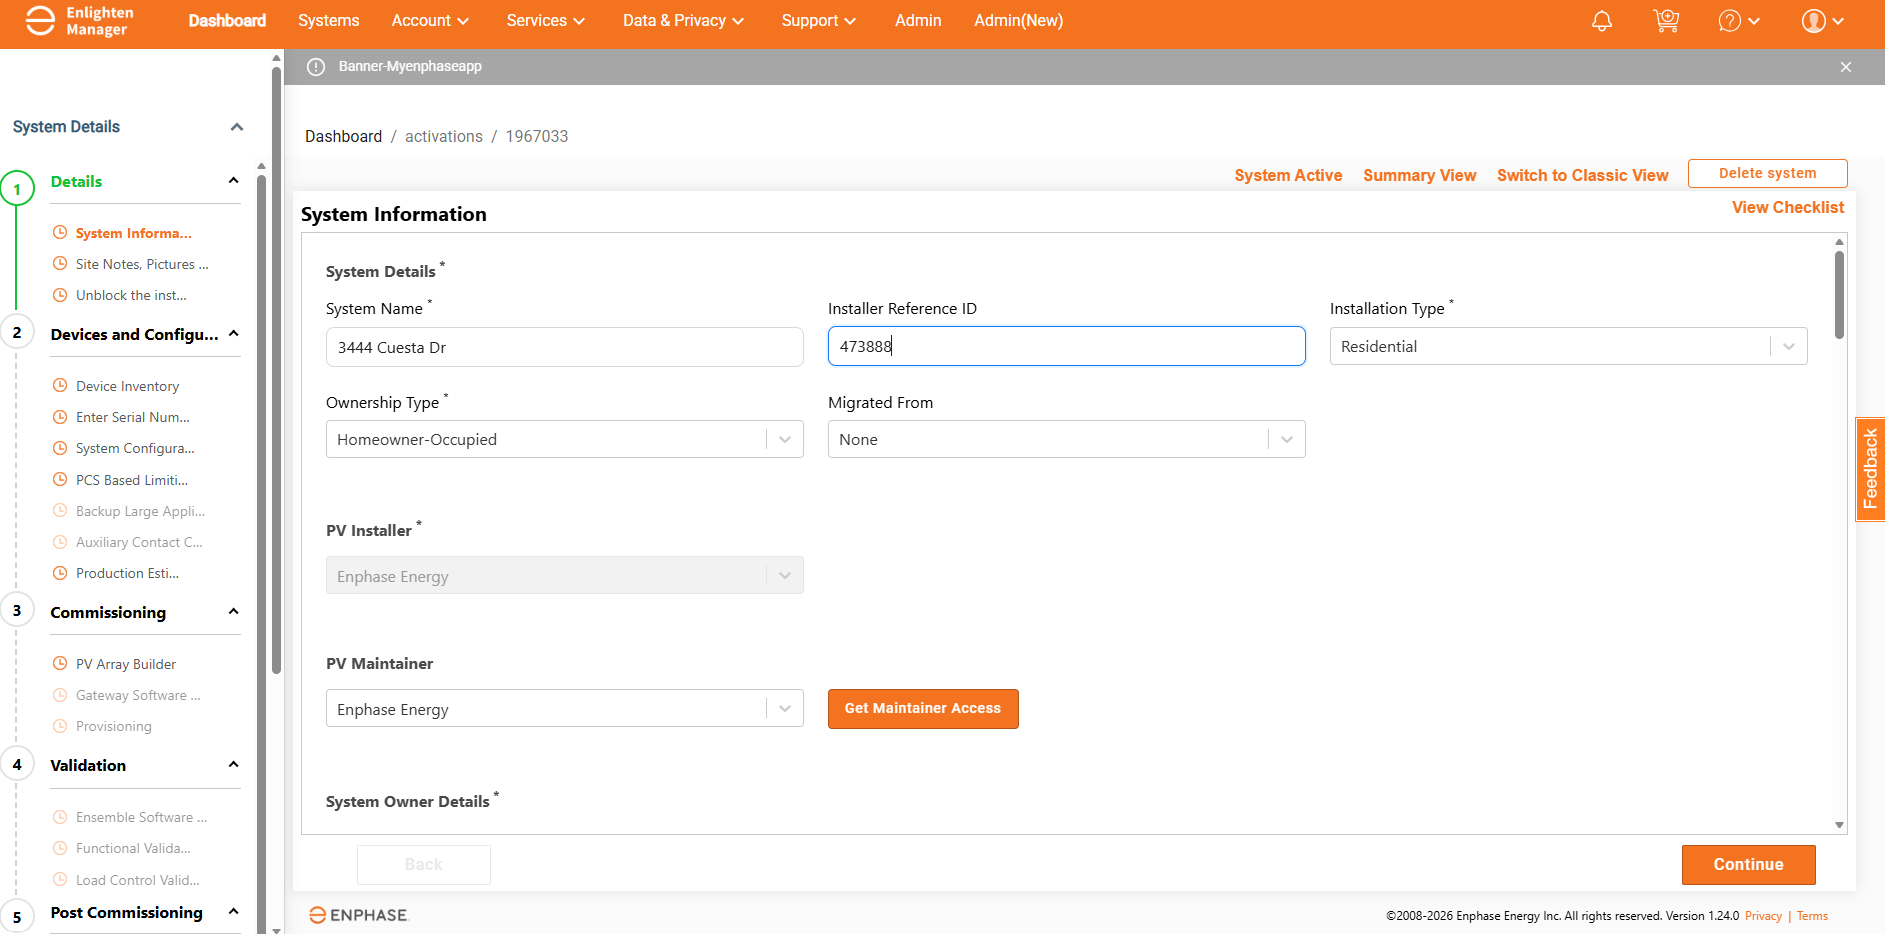
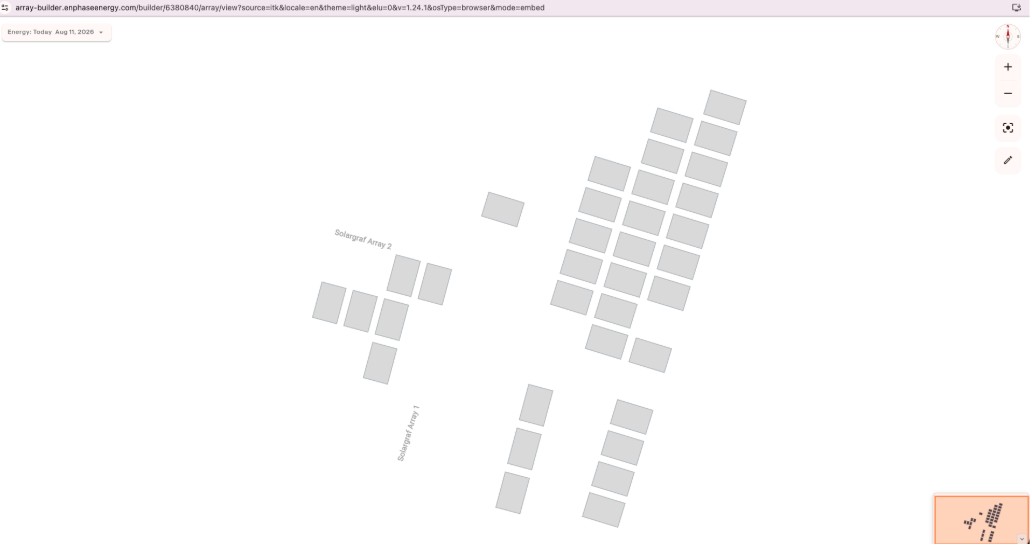
The array layout can be accessed by going to PV Array Builder in Commissioning (Step 3) and click on Launch Array Builder (Beta).
To further edit the array, click on the Edit button on the right side.
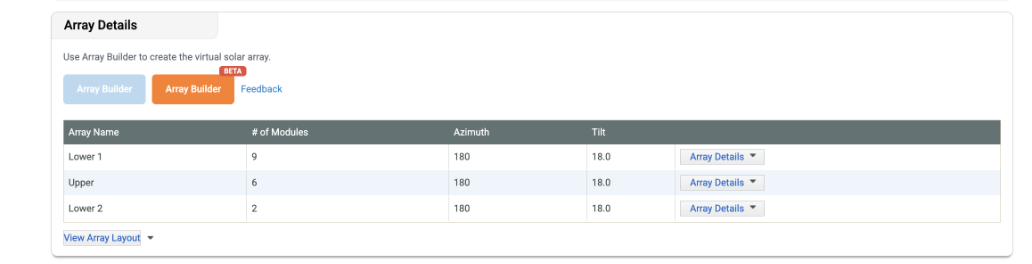
Once the system is fully commissioned using Installer Toolkit (ITK) app, the array layout details can be viewed from the Enlighten Manager system details page (https://enlighten.enphaseenergy.com/systems/<system-id>/details).Click on Array Builder Beta to view the array layout createdbySolargraf. You can also access the array layout using the direct link (https://array-builder.enphaseenergy.com/builder/<system-id>/array/create).
 A link to the Enlighten system is also provided on an overview page for future reference.
The resultingEnlighten System IDis stored in Solargraf for reference.
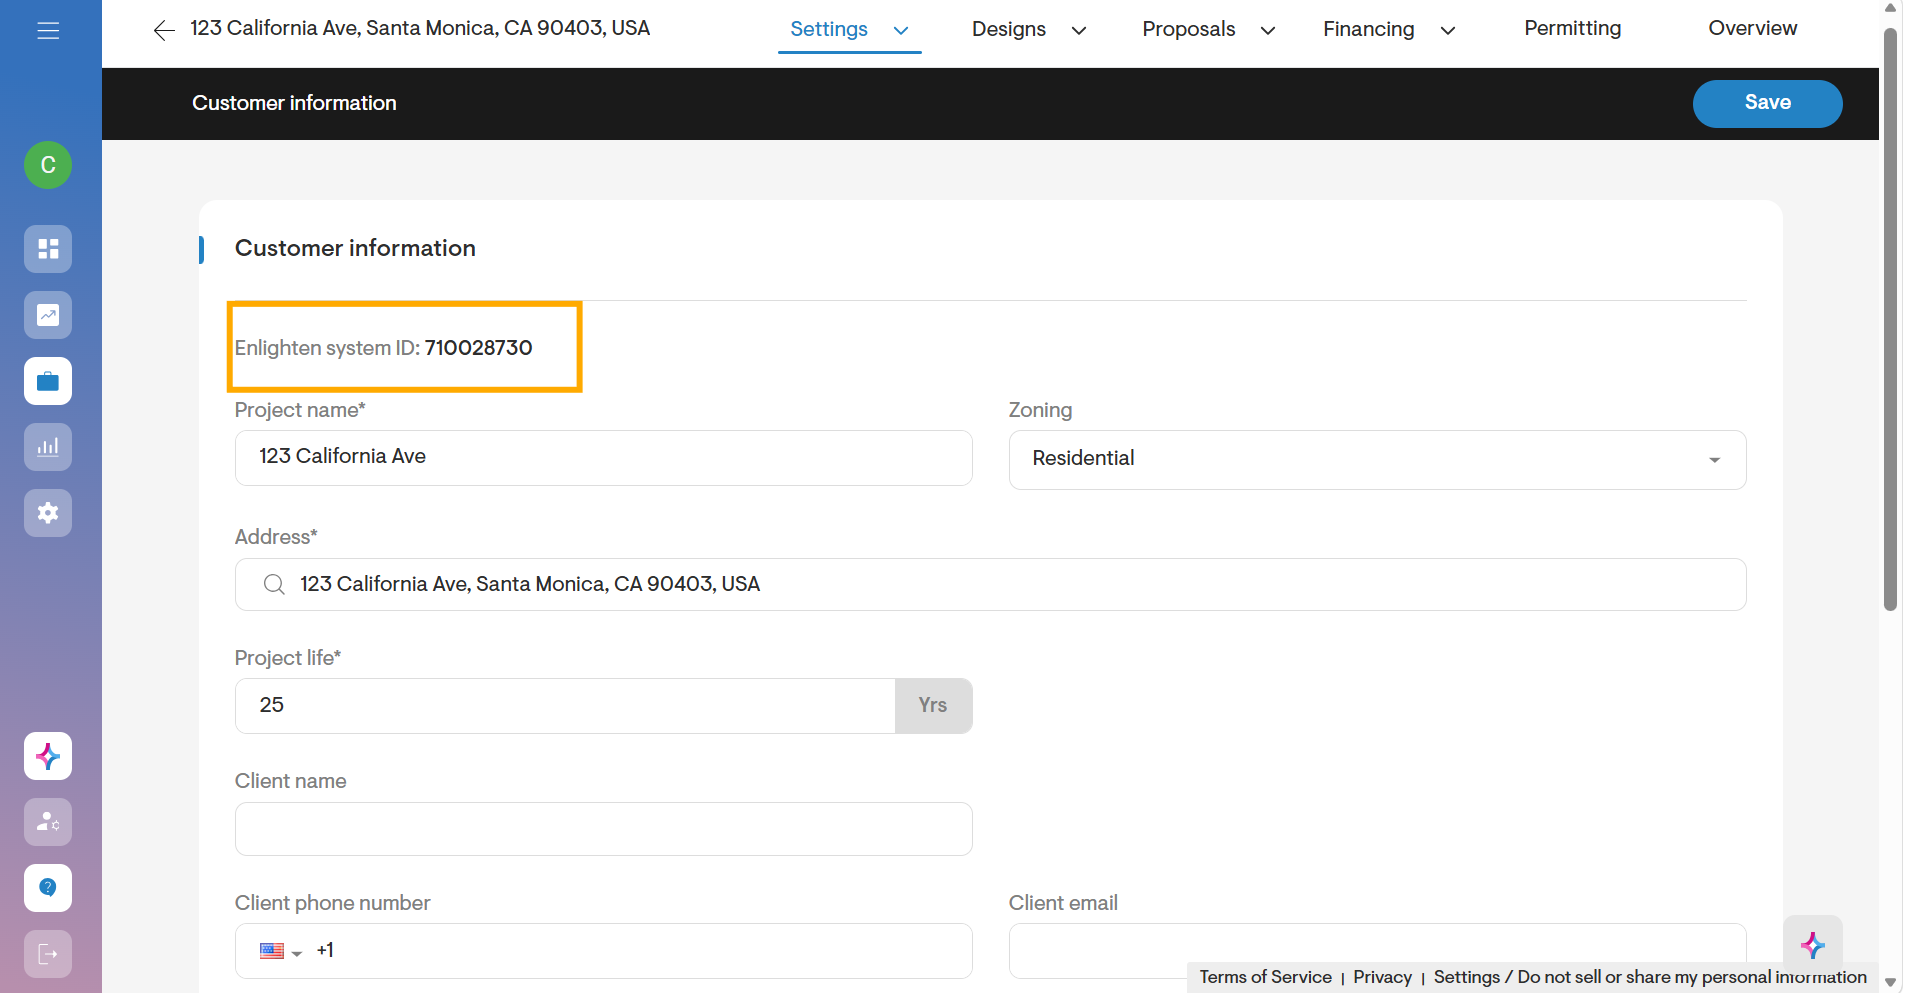
A successful export means the installer now has a connected record between the Solargraf project and the newly created Enlighten system.
Troubleshooting
| Issue | What it usually means | What to do |
|---|---|---|
| Enlighten account not connected | The company-level Enlighten integration has not been set up | Go to Company Settings and connect Enlighten under External Integrations |
| No eligible design option | The project does not currently have a supported design for export | Review the design and confirm it includes the required Enphase equipment |
| No eligible financing option | The selected design does not have a usable financing option for export | Update the project's financing configuration and check if the financing option is eligible for design option chosen |
| Export button remains disabled | A required selection or field is missing | Confirm both design and financing options are selected and required fields are complete |
| Validation errors on the export page | Required installer-entered values are missing or invalid | Correct the highlighted fields and retry the export |
If the project data is incomplete or outdated before export, the created Enlighten system may reflect that same incomplete information. Review key fields carefully before clicking Export.
Best Practices
Confirm homeowner details before starting. Accurate first name, last name, and email help avoid corrections later.
Review the selected design carefully. Make sure you are exporting the intended design option and financing option.
Use a clear system name. A recognizable system name makes the record easier to find in Enlighten.
Double-check project readiness. Confirm the address, utility-related details, ownership details, and equipment are correct before export.
Export from the final intended design. Avoid rework by making sure the design is ready before system creation.
Use the status page after export. It is the quickest way to confirm what completed successfully and what may need follow-up.
For internal operations, many installers also use the optional reference field to align the Solargraf project with a CRM, project management tool, or internal job number.
FAQs
What does Export to Enlighten do?
It creates an Enlighten system from a Solargraf project by sending selected project, homeowner, design, and system details through a guided export flow.
Who can use this feature?
Installers who have access to Solargraf, whose company has connected an Enlighten account, and whose role includes permission to create Enlighten systems can use this workflow.
Do I need to enter everything again in Enlighten?
No. The purpose of the integration is to reduce duplicate entry by sending key information from Solargraf directly into Enlighten.
Why can’t I continue past the selection pop-up to export?
You must select both an eligible design option and a valid financing option before the Proceed action be