
Creating a compelling proposal, despite NEM 3.0 complexities, is easy with Solargraf. In fact, it can be done in just a few minutes with these 5 easy steps.
Step 1: Entering homeowner information
Start by entering the homeowner’s address and project details. Choose site imagery from integrated providers or upload custom images.


For NEM 3.0 customers, Solargraf also selects the appropriate post-solar tariff and grid connection type.
Next, either upload the homeowner’s green button data or input the homeowner’s consumption data. Once the consumption data is uploaded, Solargraf will create a consumption profile, or you can create a custom profile.
Step 2: Creating the roof model
The wizard will generate a 3D model of the home by drawing the roof’s perimeter and dividing the facets, considering pitches, azimuths, and obstructions, and once rendered, the 3D model becomes visible.
Step 3: Optimizing solar panel placement
The solar design process begins with our shading wizard, which calculates shading on the roof.
 Solargraf provides an address-based list of AHJs to designate fire setbacks. Additionally, you have the flexibility to add customized setbacks based on specific project requirements.
Finally, place the panels by selecting the panel tool and roof facet. Confirm the hardware details and then click on that roof section.
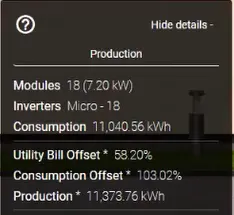
You can now calculate the production of this system. The target is to achieve 100% consumption offset; the system results in almost 114% in this example. You can modify the design by removing panels. Simply select and delete them from the array. After removing the panels, we recalculate the production to see if the refinements come closer to 100% consumption offset.
In this example, we achieved a 103% consumption offset and a utility bill offset of only 58%. To improve the utility bill offset, a battery is needed to maximize the ROI.
Step 4: Incorporating battery storage
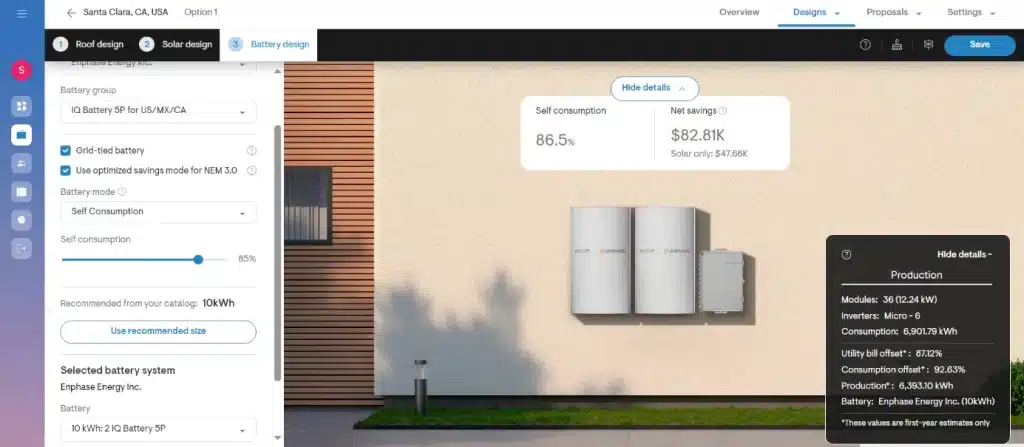
To incorporate a battery into your system design, choose Enphase as the manufacturer, and specifically, the Enphase IQ5P battery.
Solargraf allows you to model both grid-tied and backup battery systems. For this scenario, select the grid-tied option with an 85% bill offset.
The battery design section provides a recommended battery size. Adding a 10kWh Enphase IQ5P battery significantly boosts the bill offset—from 58% to nearly 90%.
If needed, adjust the battery size. A smaller battery will result in a lower bill offset.
Step 5: Generating a proposal
Our proposals offer comprehensive insights for homeowners:
- System design: Highlight the solar and battery system design.
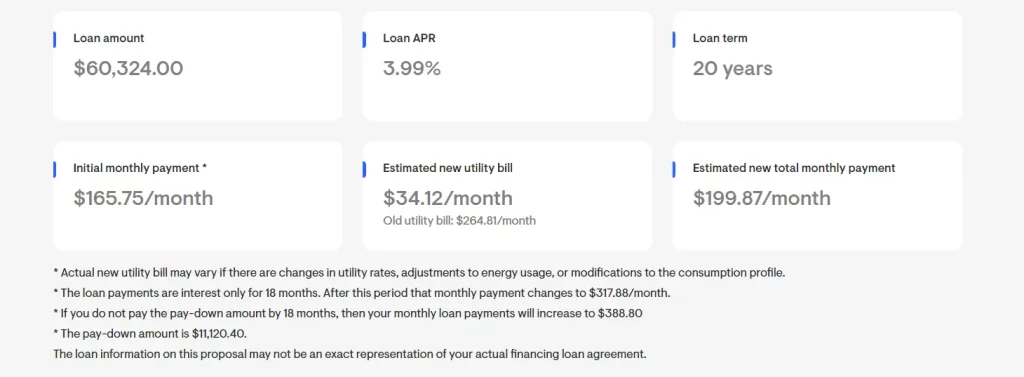
- Financing options: Present financing choices.
- Savings comparison: Clearly demonstrate the savings between the old utility bill and the /clearly de with solar and battery integration.
Ready to revolutionize your solar proposal process? Harness Solargraf now for seamless, high-ROI projects!
Additionally:
- Usage breakdown: Homeowners can view pricing, materials, and usage details.
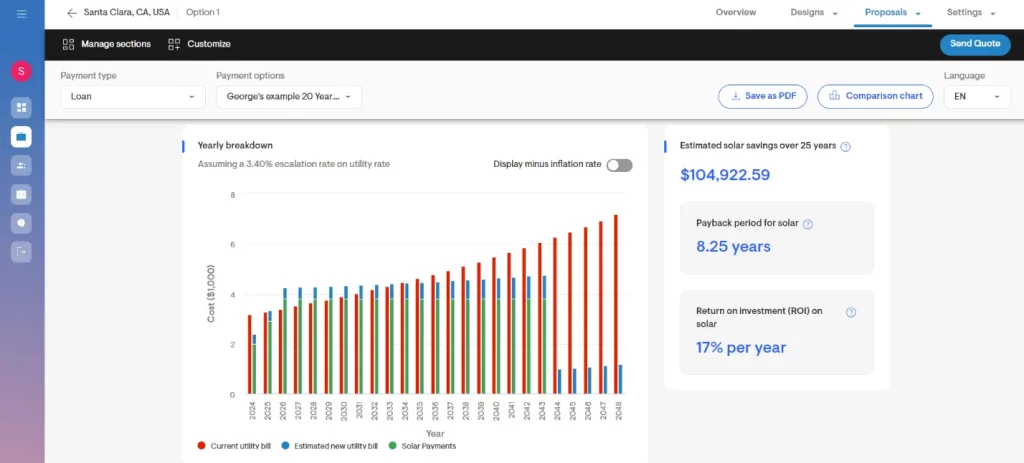
- Maximizing ROI: The graph illustrates how homeowners can charge the battery during excess solar production and avoid evening energy purchases by discharging stored energy to the grid.
In this example, the proposal estimates a payback period of 8.25 years.
Solargraf empowers you to create persuasive proposals under NEM 3.0.
Whether you are already a user or exploring Solargraf, act now—start turning prospects into successful projects!
 United States
 Germany/Austria
 Brazil
 Netherlands
 Japan
Japan