Help Center Proposal
Solargraf’s new proposal experience: How To’s
Published on 4 Feb 2025
Why we created the Express Editor
In traditional sales workflows, even minor design changes such as adjusting panel layout, or modifying battery size often require coordination with the design team creating delays during homeowner discussions and impacting close rates.
Express Editor addresses this challenge by enabling salespeople to make select adjustments themselves, in real time, during homeowner consultations.
The capabilities listed below are available only to users who have enabled the ‘Use enhanced proposal format’ toggle. You can change this setting in your user preferences.
How it works
The process begins with the designer (Solargraf user or Admin) creating a max-fit or maximum-sized solar PV layout. From either the design tool or the express editor, specific panels can be marked as "ghost" panels - which are excluded from offset and financial calculations, but not entirely deleted from the design - providing flexibility for scenario planning. The advantage of excluding panels from the design, rather than deleting them, is that the production of these panels remains known, so they can easily be re-included if the customer decides to increase the system size.
Besides editing the solar PV layout, the salesperson can also make the following adjustments directly from the express editor (more detail for each change can be found below):
Update utility, tariff & consumption details
Update battery specifications (manufacturer, model, or quantity)
Update pricing (base price for solar & battery, adders, discounts & commissions)
Import financing products (lease, loan & cash) and check relevant financing metrics
These changes are reflected instantly in the summary panel, which recalculates the system size, consumption offset, and other key financials. The bill offset value is also dynamically updated once changes are applied. As soon as changes are saved, the full proposal is updated immediately.
How to use The Express Editor when presenting
Go to the web-quote of the proposal.
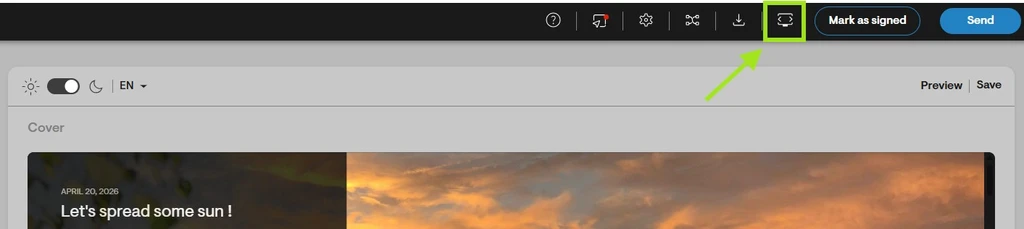
From the navigation bar, click the Presentation button.
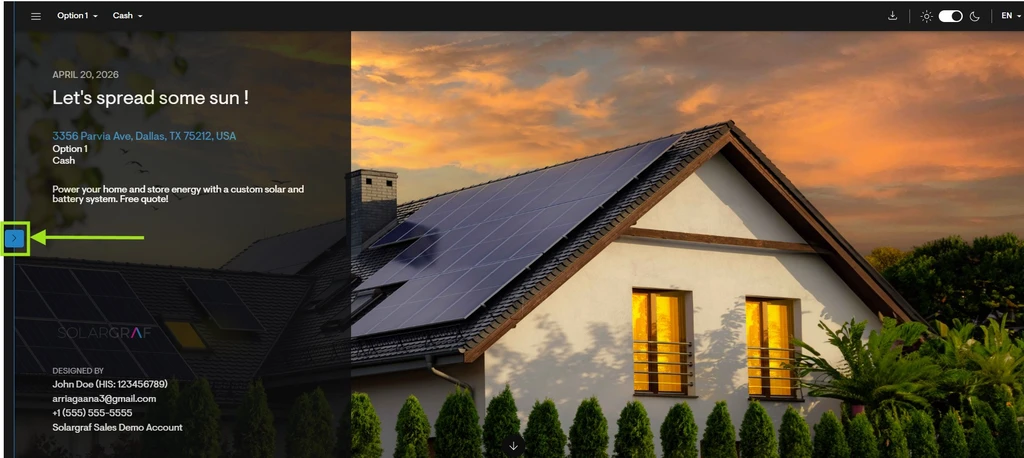
Once the proposal opens, click the left panel to access the Express Editor.
How to edit usage from the Express Editor
In the Usage tab, on top the user gets a checkbox asking whether they want to update all design options with the below usage settings.
Utility & tariff
Users can select the utility, tariff and post solar tariff in this section. Only automatic usage rates (Genability rates) are supported for ease of use. The same default selections are shown in Utility page in project overview.Electricity bills and consumption
Users can select the Input, Unit and Usage value from express editor.For Annual bills/ usage, users can select the unit as either Usage (kWh) or Bill value ($), and then update the annual usage value.
For Monthly bills/ usage, users can select the unit as either Usage (kWh) or Bill value ($), and then update the monthly values for each of the 12 months
If users have uploaded consumption via CSV upload in the Utility page, then any changes to usage shall have to be made via the Utility page only.
How to edit solar layout or system size from the Express Editor
Open the solar tab
Users can visualize the 3D design of the roof and click any panel to exclude it from the proposal. Panels that are excluded appear as translucent. Selecting these panels again will re-include them in the proposal (panels that are included in the proposal will appear as opaque). As panels are excluded or included, the system size will update dynamically. For microinverter-based designs, production updates in real-time. For string inverter-based designs, the user must first re-calculate production (since the presence or absence of one panel affects the production of a nearby panel).Save solar
Once the layout or system size has been defined (by excluding or including the desired panels), users can “save solar” to re-calculate the bill offset and all other financial metrics included on the proposal.Show or hide shading
To help illustrate why certain panels should remain included or should be prioritized for exclusion, the user can show or hide a shading heatmap that demonstrates which panels are likely to produce the most energy.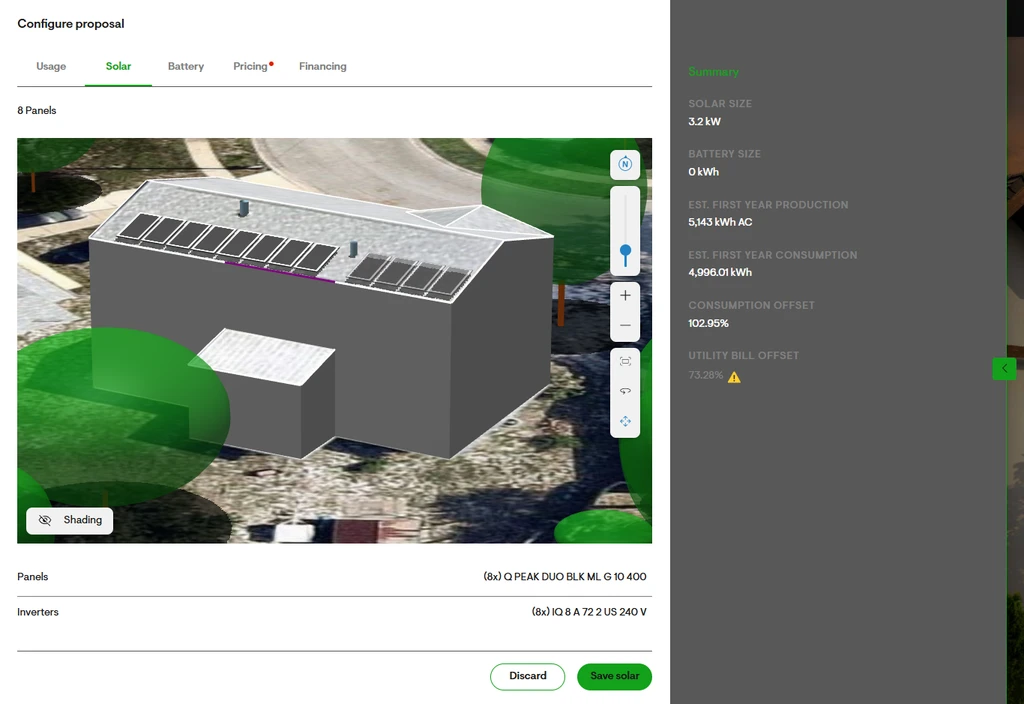
How to edit batteries from the Express Editor
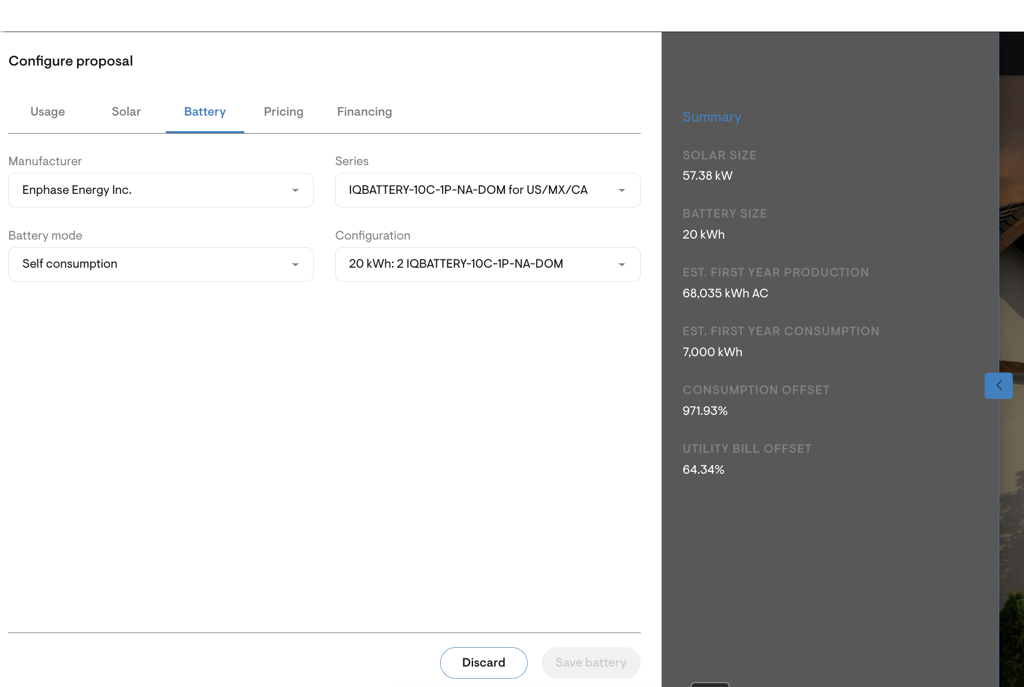
Express editor allows users to quickly update the most used parameters in the battery design tool.
Manufacturer
Series
Battery mode
Configuration
The first 3 parameters are the same as what we have in the battery design tool, added here for ease of use.
Configuration essentially refers to the number of batteries on the design. Users can quickly change the number from the Configuration input dropdown.
How to edit pricing from the Express Editor
Open the pricing tab
Users now have the exact same abilities to edit the proposal pricing from the express editor (directly from the presentation) as they previously had from the pricing settings (only accessible from the project overview).Editing price via price tables or price per watt
The express editor now supports all combinations of permission related to pricing; for outside or junior sales reps, this might mean merely choosing from a list of price tables, while for sales managers, this might mean typing in a custom gross price or price per watt.Importing and/or editing adders
Previously, a sales rep would need to first import an adder (say, roofing) from settings to the project under pricing settings. This would have required leaving the proposal. Users can now import any adder or discount from their settings, directly from the express editor. Depending on their permissions, users can also now edit adders or discounts directly from the proposal.Editing commission
Again, pending permissions, users can now edit their commission directly from the pricing tab of the express editor (rather than having to navigate away from the proposal, to pricing settings, to make this change.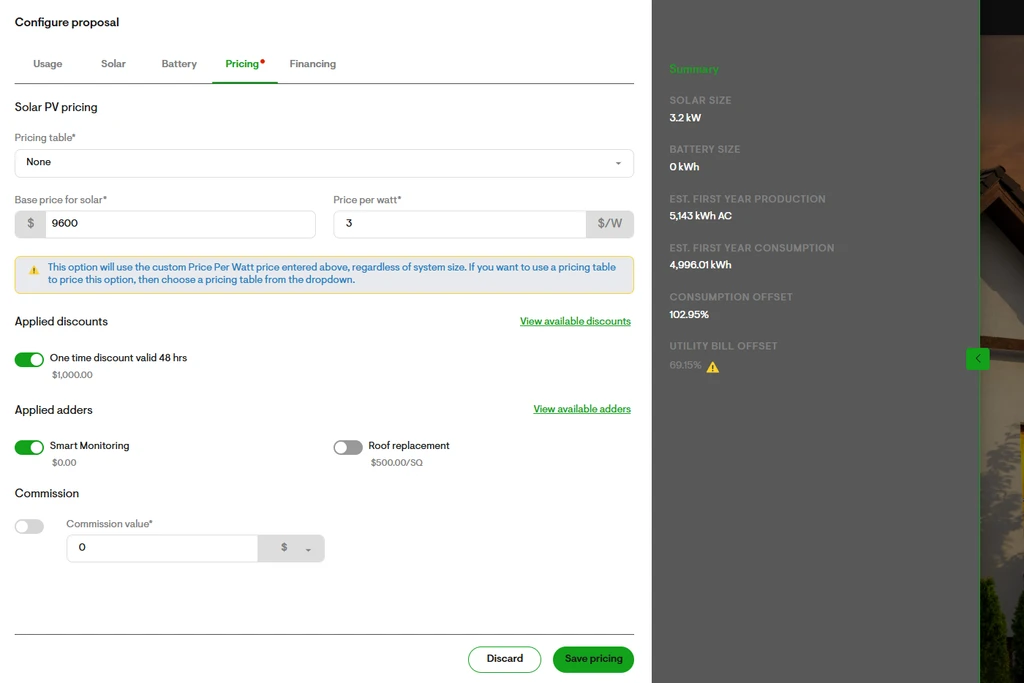
How to manage financing in Express Editor
Express editor now supports managing financing without leaving presentation mode. It helps you keep the conversation moving by letting you review, import, enable, and update financing products directly inside the proposal experience.
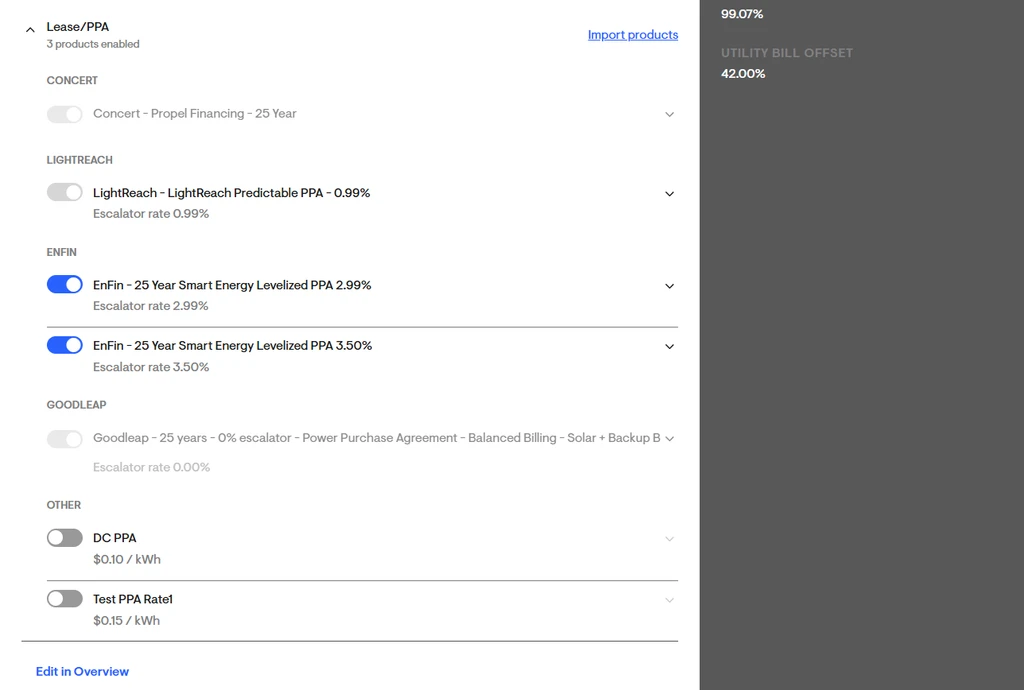
The financing experience is organized into three sections: Cash, Loan, and Lease. You can choose which financing type the proposal opens with by default, review available products, expand products to view key metrics, import lease products where available, and update financing details for supported products.
On the financing tab, the Open with selector on top controls which financing type the homeowner sees by default when the proposal opens. Only one option can be selected at a time.
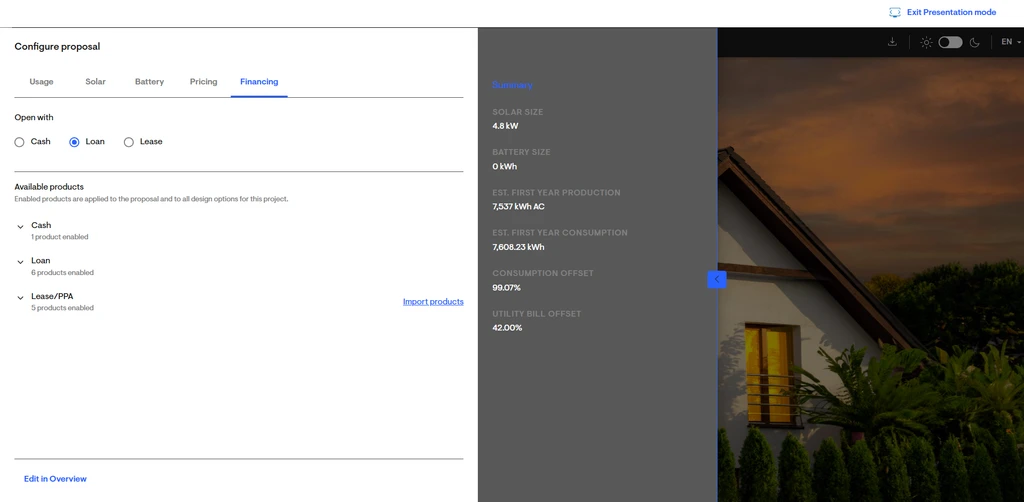
The Available products area shows the financing products that belong to the project. Each section may contain product rows with a toggle, product name, and an expand control. When expanded, the product shows key metrics calculated from the current proposal and design.
- Cash section - The Cash section displays the cash product already defined on the project financing page.
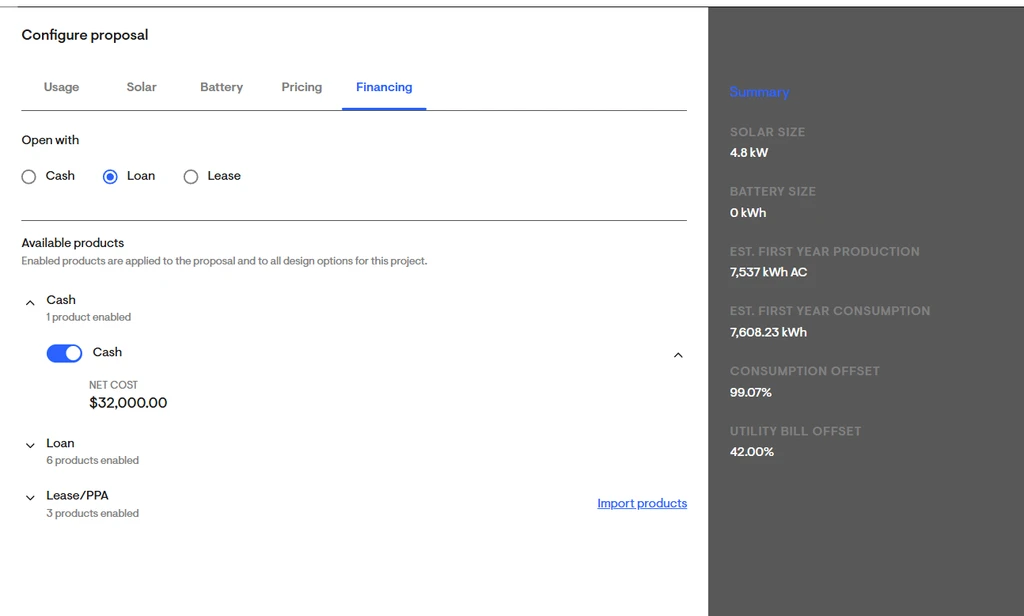
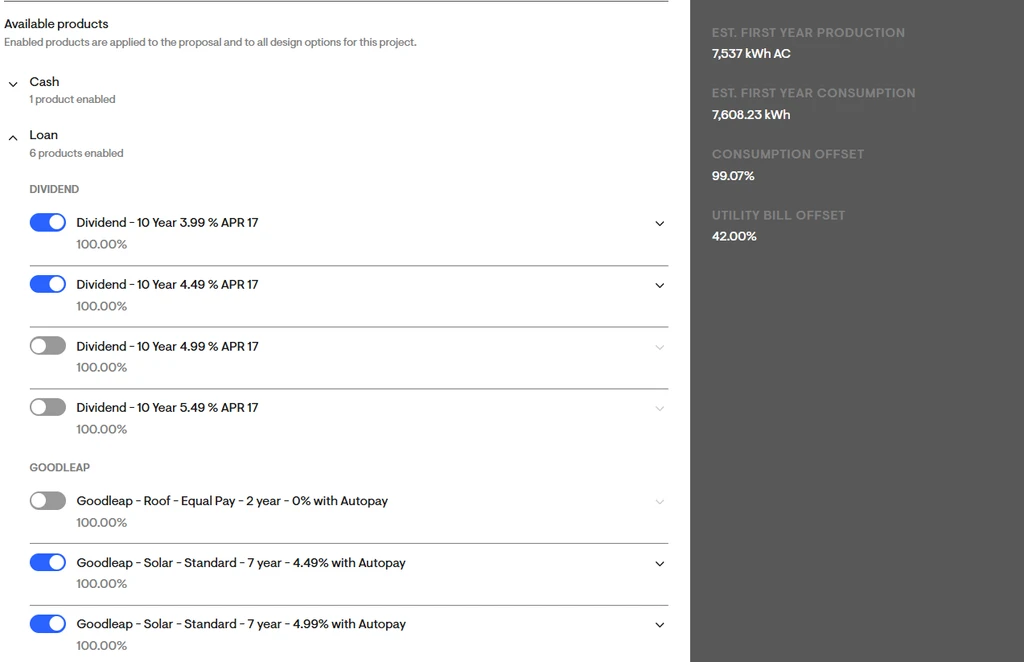
- Loan section - The Loan section displays all loan products sourced from the project financing page. Expanded loan rows show Monthly financing payment and Total financed amount. Any toggle changes you make here sync back to the project financing page and affect proposal availability for the homeowner.
For supported loan products, expanded rows include an Update details action to update dealer fee & down payment. This lets you update financing inputs without leaving Express Editor. After you save changes, the product metrics recalculate automatically.
- Lease section - The Lease section displays lease products sourced from the project financing page and groups them by lender. The Lease section shows an Import products action. This lets you bring additional lease products into the project directly from Express Editor. Newly imported products are added to the Lease section and are turned on by default.
Solargraf then runs an eligibility check for the current design. There also the additional functionality to Update payment plan directly inside Express Editor. For supported products, this action opens the same payment plan workflow used in the webquote experience. After you update the payment plan and save, Solargraf recalculates the product metrics. Unsupported lease products do not show this action.
- Watch for design changes
Changing panel count, battery setup, or other design inputs in Express Editor can affect whether a financing product remains eligible.
Keeping the homeowner in the loop
As changes are made, the proposal panel can be collapsed to review the updated summary, giving both the salesperson and the homeowner a clear view of the current design and financial impact.
Best practices for installers
Review financing before the homeowner meeting so you know which products are already available
Use Open with intentionally based on the homeowner's likely buying preference
After making design changes, revisit financing to confirm product eligibility
Expand product rows to verify payment metrics before discussing numbers
Use update actions only when you want proposal numbers to change immediately
If lease products are missing, use Import products from the Lease section instead of leaving presentation mode
Finalizing the proposal
Sales iterations can happen as many times as needed. Once the homeowner is satisfied with the system configuration, they can sign the proposal directly, at which point a signed agreement link is generated with the most recent changes locked in. Installers can also mark a design as “signed” from within the proposal if they do not wish to use the e-signature option.